Friday, October 26, 2012

Cranberry Orange Tunnel Bundt Cake

Cranberry Orange Tunnel Bundt Cake

I am happy to announce that I have a new blog, In Good Flavor.  It will contain recipes that I love, ones that I have always wanted to try, and newly discovered finds.  Unlike Food for the Finicky, the new blog will be more indulgent and adventurous with flavors. 

It has been a fun year and if anyone has added any of the recipes from my blog to their own catalog of recipes, I am honored.  But due to time constraints, I will not continue to post on this blog.  I will focus my attention on the new blog and hope that you will find it pleasing to the palate as well as the eyes.

Thank you all so much for joining me this past year.  
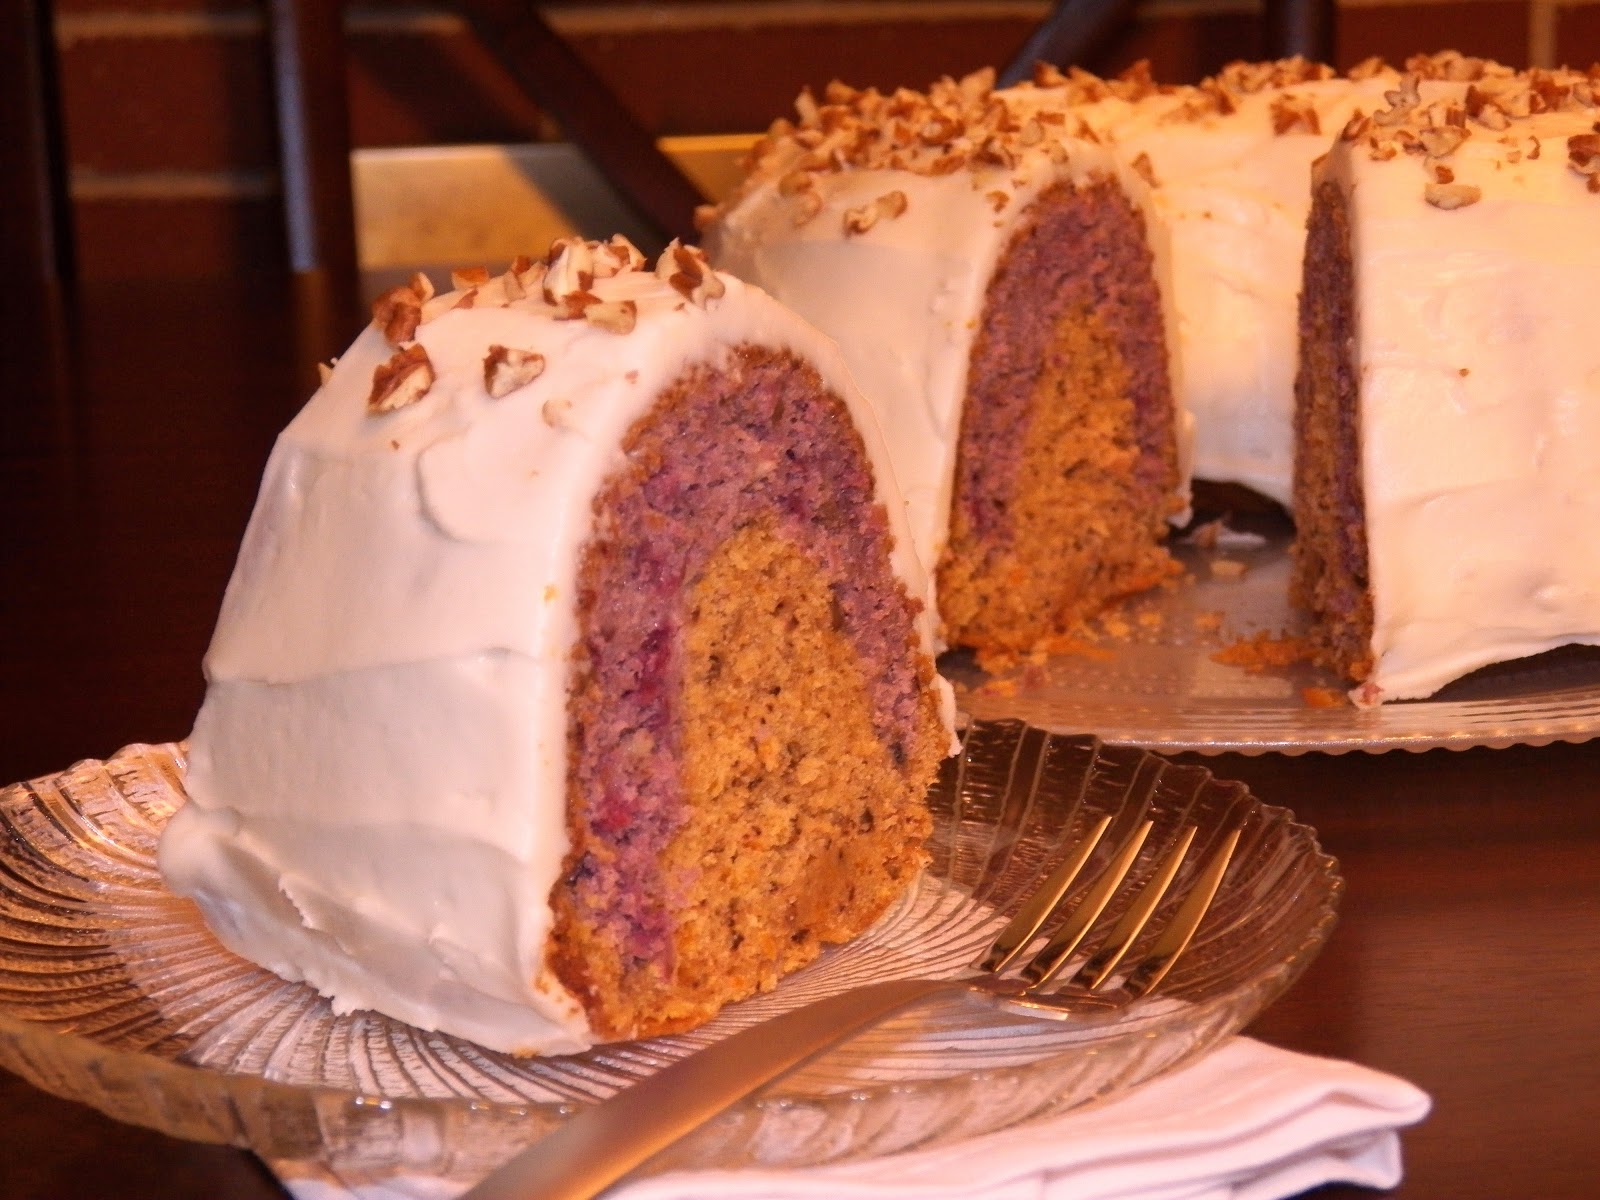
I leave you with this Cranberry Orange Tunnel Bundt Cake which is also located at In Good Flavor.


Cranberry Orange Tunnel Bundt Cake

Cranberry Cake Layer
2 eggs
1 1/4 cups flour
3/4 cup sugar
6 tblsp. butter, room temperature
3/4 tsp. baking powder
3/4 tsp. baking soda
1/4 tsp. salt
3/4 cup sour cream
1 cup whole cranberries
1/2 tsp. vanilla extract
1/2 tsp. almond extract
1 cup whole pecan (divided)
red and blue gel food coloring

Generously coat a 12 cup capacity bundt cake pan with cooking spray.  Dust with a thin layer of flour.  Tap pan to remove excess flour.

Combine flour, salt, baking powder, and baking soda in a bowl and set aside.

Place all of the pecan in food processor and puree until finely ground.  Divide in half and set aside.  

Place cranberries in the empty food processor and puree.  Set aside.

In a large bowl whisk together  butter  and sugar until light and fluffy.  Add eggs and beat until smooth and consistency slightly thickens, about one minute.  Blend in vanilla and almond extract. 

Alternately add the flour mixture and sour cream, starting with a third of the flour, then half of the sour cream, another third of the flour, the remaining sour cream, and ending with flour.  Blend in cranberries and half of the ground pecan. 

Fill a 1/4 tsp. measuring spoon with 5 parts of red to 1 part of blue food coloring. Blend into batter.  Adjust color as needed to obtain your desired shade.

Pour into the prepared bundt cake pan.  Set aside.


Preheat oven to 350 degress F.


Orange Cake Layer
2 eggs
1 1/4 cups flour
3/4 cup sugar
6 tbsp. butter, room temperature
3/4 tsp. baking powder
3/4 tsp. baking soda
1/4 tsp. salt
1/2 cup sour cream
1/2tsp. vanilla extract
1/2 tsp. almond extract
1/2 of ground pecan from above
grated orange rind from 2 medium oranges ( 1 1/2 to 2 tablespoon grated)
1/4 cup fresh squeezed orange juice
red and yellow food coloring


Combine flour, salt, baking powder, and baking soda in a bowl and set aside.

In a large bowl whisk together  butter  and sugar until light and fluffy.  Add eggs and beat until smooth and consistency slightly thickens, about 1 minute.  Blend in vanilla extract, almond extract, and grated orange peel. 

Alternately add the flour mixture and sour cream, starting with a third of the flour, then half of the sour cream, another third of the flour, the remaining sour cream, and ending with flour.  Blend in orange juice and pecans.

Fill a 1/4 tsp. measuring spoon with 2 parts yellow to 1 part of red food coloring.  Blend into cake batter.  Adjust color as needed to obtain your desired shade.

Pour into the bundt cake pan.  Bake for 45 minutes or until a toothpick comes out with a few crumbs when inserted into cake.  Allow to cool. 

Frost with Cream Cheese Pecan Frosting.  Sprinkle cake with chopped pecan.  Store refrigerated.

Serving suggestions:  microwave slices of cake for 8-10 seconds before serving.  I find that the consistency of refrigerated cakes tend to be rigid and microwaving brings them back to their original consistency.


Cream Cheese Pecan Frosting

8 oz. cream cheese, room temperature (reduced fat is fine)
4 oz. butter, room temperature
1/2 tsp. vanilla extract
1/2 tsp. almond extract
3 cups powdered sugar

Whisk cream cheese and butter until creamy.  Add vanilla and almond extract.  Gradually add powdered sugar.  Whisk until smooth and creamy.


Print Friendly and PDF
Follow FoodforFinicky on Twitter

Wednesday, October 10, 2012

American Chop Suey


American Chop Suey

Who doesn’t remember the lunch room staple of yesteryear, American Chop Suey?  At least, that is what we call it here in New England.  Made of pasta, tomato sauce, and beef, what is not to like?  To me, it is a little taste of nostalgia.

The American Chop Suey of my past always had green pepper.  I don’t mind green pepper, but it doesn’t like me.  I usually omit it in my cooking, but American Chop Suey just isn’t the same without it.  I use only a small quantity to provide a subtle hint of pepper, but not so much that it overpowers the dish.  My healthy twist on this dish is hidden veggies and a low glycemic, high fiber macaroni.  


American Chop Suey

16 oz. elbow macaroni (I use Dreamfield brand with high fiber and low glycemic index)
1 lb. ground beef
1/2 onion, chopped
2 cloves garlic, minced
1 large carrot, finely chopped
1/3 of a green pepper, diced
4 oz. mushroom, finely chopped
1 (28 oz.) can crushed tomato
1 (15 oz.) can tomato sauce
1 1/2 tsp. dried oregano 
2 tsp. sugar
1.5 to 2 tsp. salt
1/2 tsp. black pepper
1 tbsp. olive oil
8 oz. fresh mozzarella cheese, sliced

Preheat large saucepan on medium high heat.  Add olive oil.  Add ground beef and brown using a wooden spatula to break apart into small crumbles.  When beef is almost entirely brown, add carrots and cook for 3 minutes, stirring frequently.  Stir in the onion, mushroom, green pepper, garlic, oregano, salt and pepper.  Cover, reduce heat to medium low and simmer for 8 – 10 minutes.  Add crushed tomato, tomato sauce, and sugar.  Cover and allow to simmer for 15 -20 minutes.  Adjust seasoning to taste.

Boil pasta according to package direction, but drain when it is al dente (has a slight chew).  Do not cook all the way as it will finish cooking in the sauce. 

Add pasta to sauce.  Transfer to a large oven safe casserole dish or proportion into smaller dishes.  Top with desired amount of mozzarella cheese.  Broil until cheese is bubbly and slightly brown.


Print Friendly and PDF
Follow FoodforFinicky on Twitter

Friday, September 28, 2012

Pork Meatballs and Rice Soup


Pork Meatballs and Rice Soup

I can usually get children to eat things that they would not typically eat if I incorporate it into rice.  Cabbage is hidden in the meatballs and in the broth base of this soup.  Although it was not done in this batch, I would sometimes add finely chopped mushroom to the meatballs as well to provide an extra boost of nutrition.  To make it easier to eat, I cut up the pork meatballs before serving to young children.

Personally, I like the rice slightly overcooked, to the point where it splits open.  It absorbs more liquid and thickens the soup even more.  If you don't want to take the rice to this point, feel free to use a full cup of rice in the recipe.  This soup makes warm comforting lunch on a crisp fall day.


Pork Meatballs and Rice Soup

3/4 cup uncooked rice
1 cup finely chopped cabbage
1/2 of a large onion, finely chopped onion  
1 large carrot finely chopped
2 tsp. soy sauce
5 (14.5 oz.) reduced sodium chicken broth
1/2 tsp. salt
1/4 tsp. pepper
a couple one quarter inch slices of fresh ginger
1 tbsp. olive oil

For Meatballs:
1 lb. ground pork
1/3 cup finely chopped scallion
3/4 tsp. minced ginger
1 tsp. minced garlic
1 cup finely chopped cabbage
1/2 scant tsp. salt
1/2 scant tsp. pepper
1 tsp. soy sauce
1 egg

Combine all of the meatball ingredients in a large bowl.  Roll into 1” to 1.25” meatballs.  Set aside.

Add oil to a large pan on medium heat.  Add onion, carrot, and cabbage.  Sauté for two minutes.  Stir in rice and cook for an additional 2 minutes.  Add chicken broth, salt, pepper, soy sauce, and ginger slices.  Stir well.  Bring to a boil on high heat, stir, and reduce heat to medium low.  Cover and simmer for 10 minutes. 

Add meatballs, stirring gently.  Bring to a second boil on high.  Reduce heat and simmer for 15 or so minutes.  Remove ginger slices before serving.


Print Friendly and PDF
Follow FoodforFinicky on Twitter

Monday, September 17, 2012

Candied Apple Skewers


candied apple skewers

Here’s the thing.  Candied apples are beautiful to look at.  They come in a variety of base coatings (semisweet chocolate, white chocolate, caramel, etc.) and a plethora of decorative toppings.  Some candied apples are just too beautiful to eat.  My problem is that they are not the easiest thing to bite into.  I always have to cut mine into slices and half of the candied coating usually falls off during the process.

My Candied Apple Skewers have all of the components of whole candied apple only so much easier to eat.  It is smaller than the conventional candied apple therefore you don’t have to feel committed to finishing an oversized snack.

The ones pictured on this post are drizzled with semisweet or white chocolate and covered with sprinkles—ingredients I just happen to have today.  But, next time, chocolate with chopped almonds and coconut flakes!


Candied Apple Skewers

1 large unpeeled apple (cored, quartered and cut into 24 chunks)
4 oz. chocolate of choice
half of a lemon
1 cup water
Candied sprinkles or any topping of choice
8 lollipop sticks
1 wooden skewer
Something to stand the apple skewers on (Styrofoam block, or any base  that you can poke holes into) 

Note
To make a larger quantity, adjust the chocolate amount according to the number of apples used, 8 oz. chocolate for 2 apples, 12 oz. chocolate for three apples, and so on.


Place water in a small bowl.  Squeeze in the juice of half a lemon.  Place cut apples into a bowl of lemon water and allow to sit for a minute.  Remove apples and dry with a paper towels. 


Poke holes through the center of each apple chunk using the wooden skewer (this will allow the lollipop sticks to be inserted easily without splitting the chunks).  Insert three apple chunks on each lollipop stick.  Set aside. 

Place chocolate in a small  microwaveable bowl and microwave on high for 30 seconds.  Stir smooth.  If still lumpy after stirring, microwave at 15 seconds intervals until completely melted.

I didn't have a handy base ready, this half a lemon does the job perfectly!

Use a fork or knife to drizzle chocolate onto apples.  Shake on candied sprinkles.  Stand apple skewers on a base and refrigerate for about 10 minutes.  After 10 minutes, apples can be transferred onto a parchment lined plate.   Keep refrigerated.  Makes about 8 apple skewers.


Print Friendly and PDF
Follow FoodforFinicky on Twitter

Monday, September 10, 2012

Cinnamon Sugar Lavash Chips and Cream Cheese Apple Dip


Cinnamon Sugar Lavash Chips and Cream Cheese Apple Dip

It’s been several weeks since my last post.  August has been a busy month and I’m sorry to say that I haven’t had the motivation to spend the extra hours in the hot kitchen to tweak recipes and take pictures of food.   Luckily, for this blog the end of summer is upon us with fall soon to take its place.  When it does, my nesting instinct should also return and with it more motivation to stay in the kitchen.

To get things moving, here is an easy, light snack using lavash and reduced fat cream cheese.  Lavash is a soft flatbread.  The brand I use, Joseph’s, contains flax and comes in a package of four 9” x 11” inch sheets, each containing 6 grams of fiber, 10 grams of protein, and has only 100 calories.  It is not only good for wraps, but also for making chips and pizza. 


Cinnamon Sugar Lavash Chips and Cream Cheese Apple Dip

2 sheets of lavash                                                                              
4 tsp. sugar in the raw
3 rounded tbsp. apple jelly
1/4 scant tsp. ground cinnamon for dip, plus extra to sprinkle on lavash  
6 oz. reduced fat cream cheese, room temperature
2  rounded tbsp. powdered sugar or 3/4 tsp. White Stevia Powder
3 rounded tbsp. peeled and minced apple
cooking spray

Preheat oven to 375 degrees F.

For dip, place cream cheese, powdered sugar, 1/8 tsp. cinnamon in a small bowl.  Place apple jelly in a small ramekin size bowl and microwave for 10 seconds, stir until smooth.  Add to cream cheese mixture.  Whisk until smooth and creamy.  Add minced apple and combine.  Place in the refrigerator to set for 20 minutes.

Cut each lavash into 24 triangles using a sharp knife or a pizza cutter.  Spray top of lavash with cooking spray.  Transfer to cookie sheets in a single layer, greased side down.  Spray second side of lavash with cooking spray.  Top with a sprinkling of cinnamon and sugar in the raw.  Bake until light brown, about 5 to 6 minutes.  Allow to cool on a rack or on top of paper towels.  Serve with dip.


Print Friendly and PDF
Follow FoodforFinicky on Twitter

Tuesday, August 14, 2012

Cheesy Ham Toast

cheesy ham toast

The inspiration for this recipe came from Shrimp Toast.  But, as you can see from the name of this post, it metamorphosed immensely from conception to end product. 

Allow me to explain my thought process.  Since shellfish should be avoided by very young children and since most of the older ones that I know don’t like shrimp, it needed to be replaced.  Then of course, there is the need to add a healthy element (the broccoli).  So, after several recipe revisions in my head and several actual trial runs, I ended up with Cheesy Ham Toast.  The shrimp has been replaced by ham and the cheese was added along with egg substitute as the binding agent.  The final result has very little resemblance to Shrimp Toast, but tasty nonetheless. 


Cheesy Ham Toast

6 slices of Country White bread or any other firm sandwich bread
1 cup coarsely chopped deli honey ham
3/4 cup coarsely chopped cooked broccoli
1/4 cup egg substitute
1.5 cup shredded cheese, divided (I used four cheese pizza blend)
a pinch each of salt, black pepper, and cayenne pepper
1 -2 tbsp. olive oil


Place ham, egg substitute, broccoli, salt, pepper, cayenne, and 1/4 cup of cheese in a food processor and pulse (for less than a minute) until mixture is minced, but not pureed.  

Place bread slices on a cookie sheet and brush the tops with olive oil.  Broil on HIGH until bread turns golden brown, about 1 minute.  Remove from oven, turn slices over and brush the tops with olive oil.  Broil the second side until golden brown.  Remove from oven.


Spread ham mixture on each slice of bread.  Top off with the remaining cheese.  Broil on LOW for about 7-8 minutes or until cheese bubbles and develop light brown spots.

Cut into wedges and serve.


Print Friendly and PDF
Follow FoodforFinicky on Twitter

Tuesday, July 31, 2012

Banana "Ice Cream" Fakeout


banana ice cream fake out, soft serve ice cream

So, the only problem I have with this recipe is that I didn’t come up with it myself!  I saw Rachael Ray make this quick and simple “ice cream” using only bananas and milk, and I had to try it.  The consistency is that of soft serve ice cream.   It’s ingenious AND healthy to boot!

In my haste to share this recipe, I didn’t invest too much time playing around with it.  When I’ve found the opportunity to experiment and come up with additional variations, I will share them with you. 

Until then, here’s how to make it.


To get the ice cream into scooping and stacking 
consistency, I froze it  for about 1 hour.


Banana “Ice Cream” Fakeout
Slightly adapted version of Rachael Ray's

3 bananas, frozen and cut into small chunks
1/4 to1/2 cup milk (I used 1% milk)
1 tbsp. agave nectar (optional, for added sweetness)
1 tsp. vanilla extract  

Start by pulsing banana in a food processor to break up the chunks. 

Puree bananas, adding milk, a little bit at a time, until mixture begins to smooth out.   Add vanilla and agave nectar.  Continue pureeing, adding more milk if needed, until mixture becomes thick, smooth, and creamy. 

Rachael says it should take about 2 minutes to whip.  It took me about 5 minutes.  I had to use a spoon to break up and redistribute the semi frozen mixture a couple of times when it seized up in the food processor.

The original recipe says to serve immediately, but if the consistency is too soft, I recommend freezing the ice cream for at least one hour to firm it up. 

Makes about 3 ½ cups.


Print Friendly and PDF
Follow FoodforFinicky on Twitter