Friday, March 30, 2012

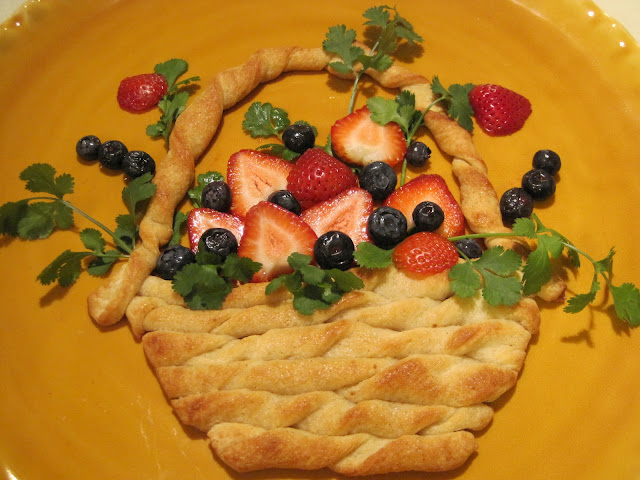
Fruited Bread Basket

an edible bread basket with a fruit arrangement

This is more of a method than an exact recipe…a completely edible fruity bread basket.  I use a can of refrigerated pizza crust, but any pizza, bread, or pie dough will do.  This basket is berry themed, but any combination of fruit can be used.  Let the florist in you shine!

I make two (approx. 7 inches wide) bread baskets from one can of  pizza crust that has been cut into strips and twisted.  This is not an exact science; make one, two or several smaller baskets.  Just keep in mind, the larger baskets require longer strips of dough which are a little more difficult to handle than shorter ones.  

Fruited Bread Basket

1 13.8 ounce can of refrigerated pizza crust
1 tbsp. butter, melted
1 tbsp. sugar
1/4 tsp. cinnamon (or more if you’d like more cinnamon flavor)
cut up fruit of your choosing
a few sprigs of herbs

Preheat oven to 425 degrees F.

Remove pizza dough from can and unroll on a flat work surface.  Gently stretch and shape dough into a rectangle as best as possible.  Use a pizza cutter or a knife to cut nine strips along the length of the dough.  Strips should roughly be 3/4” x 12”.  Cut six of the nine strips in half.  


For the bottom of the basket:
Take one of the half pieces and twist to create a spiral (I hold an end in each hand and twist the ends in opposite directions).  The dough will stretch as you work with it.  Place on a greased cookie sheet.  Repeat four more times, placing the new spirals underneath the previous ones.  Make sure they come in contact. 

Use a pizza cutter to cut and taper the sides (wider on top, narrow on bottom).  

For the handle:
Twist one of the longer strips and attach handle to the top of the basket.  Note: the longer the handle, the more fruit can be added to the arrangement.

Repeat steps for the second basket.    There should be unused strips which could be used as replacement pieces if needed.

Combine sugar and cinnamon.  Brush the melted butter onto the baskets and sprinkle cinnamon sugar on top.  Bake on upper half of oven for about 18 minutes or until golden brown.  Check oven at the 12 minute mark.  If the baskets bake unevenly, cover the dark areas with foil to prevent over browning.  Allow to cool.  Decorate with fruit and herbs.  Makes 2 (approx. 7 inch wide) baskets.   


Print Friendly and PDF
Follow FoodforFinicky on Twitter

Thursday, March 22, 2012

Dinner Cupcake

barbecue chicken and mashed potato in a dinner cupcake
Here is a fun way to serve barbecue chicken and mashed potato—in the form of a cupcake.  It not only looks pretty, but also allows me to hide vegetables; in this version I tossed in mushrooms and onion.  There is an array of vegetables that would work well…broccoli, cauliflower, corn, and spinach to name a few.  It’s a great way to use leftovers!

My group of little kids love this presentation. 


Dinner Cupcake

1 cup finely diced mushrooms (I like button or baby bellas)
1/2 cup finely diced onion
1 1/2 cup finely diced cooked chicken
about 2 cups mashed potato
1/3 cup honey barbecue sauce
1 heaping teaspoon flour
1/8 tsp. salt 
dash of pepper
olive oil
water

Preheat oven to 350 degrees F.

Preheat a medium size skillet on medium heat.  Coat bottom of skillet with olive oil.  Add mushrooms, onion, salt and pepper.  Cook until tender, about 8 - 10 minutes adding a splash of water if the content sticks to skillet.  Reduce heat to medium low.  Sprinkle flour over mixture, stir for about 1 minute.  Add barbecue sauce and water.  Stir to combine.   Blend in chicken and remove from heat.

Place six paper muffin cups on a small cookie sheet (filled cupcakes will be hard to remove if placed in muffin tins).   Distribute filling equally among each cup.  Handle gently to help muffin cups retain their shape.  Scoop mashed potato into a plastic bag, twist the opening closed, and cut a half inch opening off the tip of one corner.   Squeeze about 1/3 cup of potato through the half inch opening in a swirling motion over the chicken filling in each cupcake.  Bake 8 – 10 minutes. 


Print Friendly and PDF
Follow FoodforFinicky on Twitter

Thursday, March 8, 2012

Cheddar Crackers

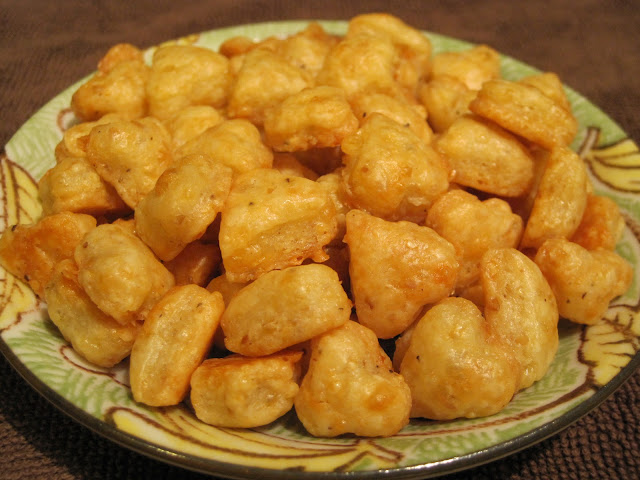
cheddar crackers, goldfish, cheez it

Why make your own crackers when you can easily buy them at the store?  I can give you seven good reasons:  flour, cheese, butter, flaxseed, water, salt and pepper.  That’s it!  They are all natural ingredients that we can pronounce.  By making it at home, you can control the amount of salt as well as fiber by using wheat flour and/or adding flax.  It’s actually not as intimidating as it seems.  I have only recently attempted to make crackers and love how simple it is.  I promise, you won’t have a hard time finding taste testers!   

I got this recipe from HomeCooking in Montana who cited Savory Seasoning as her source.   When trying out a recipe, I like to cut it in half whenever possible to avoid waste in the event that it does not turn out right or it doesn’t suit my taste.  I followed the cracker recipe (mostly) as written, but cut the ingredients in half and added flaxseed (of course).  The crackers are supposed to taste like Cheez It or Goldfish.  To, me it tastes more like the former.  Either way, it is very appetizing. 

In these photos I used ½ to ¾ inch fondant molds that can be found in a kitchen or craft store.  They make cute little perfectly sized crackers for young children, but they are time consuming to mold.  Using slightly larger molds, a pastry or pizza wheel, or cutting freehand will save time.  As Ellie from Home Cooking in Montana recommends, chill the dough before cutting out shapes, and chill it again just before baking if the dough has been worked on a while to allow for maximum cracker puffiness. 

This is a perfect recipe to make with the kids on a rainy day.


Cheddar Crackers 
(Adapted Home Cooking in Montana.  My version is half the original recipe.)

1/2 cup all purpose or wheat flour (I used all purpose)
1/4 heaping tsp. salt
2-3 tsp. golden flaxseed meal (optional)
1/4 tsp. ground pepper
2 tbsp. cold unsalted butter, cut into small pieces
4 ounces grated sharp cheddar cheese (I like to use freshly grated)
about 2 tbsp. cold water

Pulse the flour, salt and pepper, then add butter and pulse until the mixture resembles coarse meal.  Add grated cheese a little at a time until the mixture again resembles coarse meal.

Slowly add 1½ tablespoon water while pulsing.  If the mixture does not come together, add a little more until it forms into a ball.  This process will take about a minute or two. 

Place dough in a plastic wrap and chill for 20 minutes or up to 24 hours.  Place dough between 2 pieces of parchment paper and roll out to 1/8” thickness, the desired thickness for maximum puffiness and crispiness.  Use molds, a pastry or pizza wheel, or knife to cut out shapes.  Transfer cutouts onto a greased cookie sheet.  Chill in refrigerator for at least 15 minutes. 

Place cookie sheet on the top or second-down-from-the-top shelf of a preheated 350 degrees F oven. The bottom of the crackers will brown too quickly on the lower shelves.  Bake for 15-20 minutes or until crackers are golden brown.  Place crackers on paper towels to cool.  Makes about 5 to 6 ounces of crackers. 


Print Friendly and PDF
Follow FoodforFinicky on Twitter