Showing posts with label Dessert. Show all posts

Friday, October 26, 2012

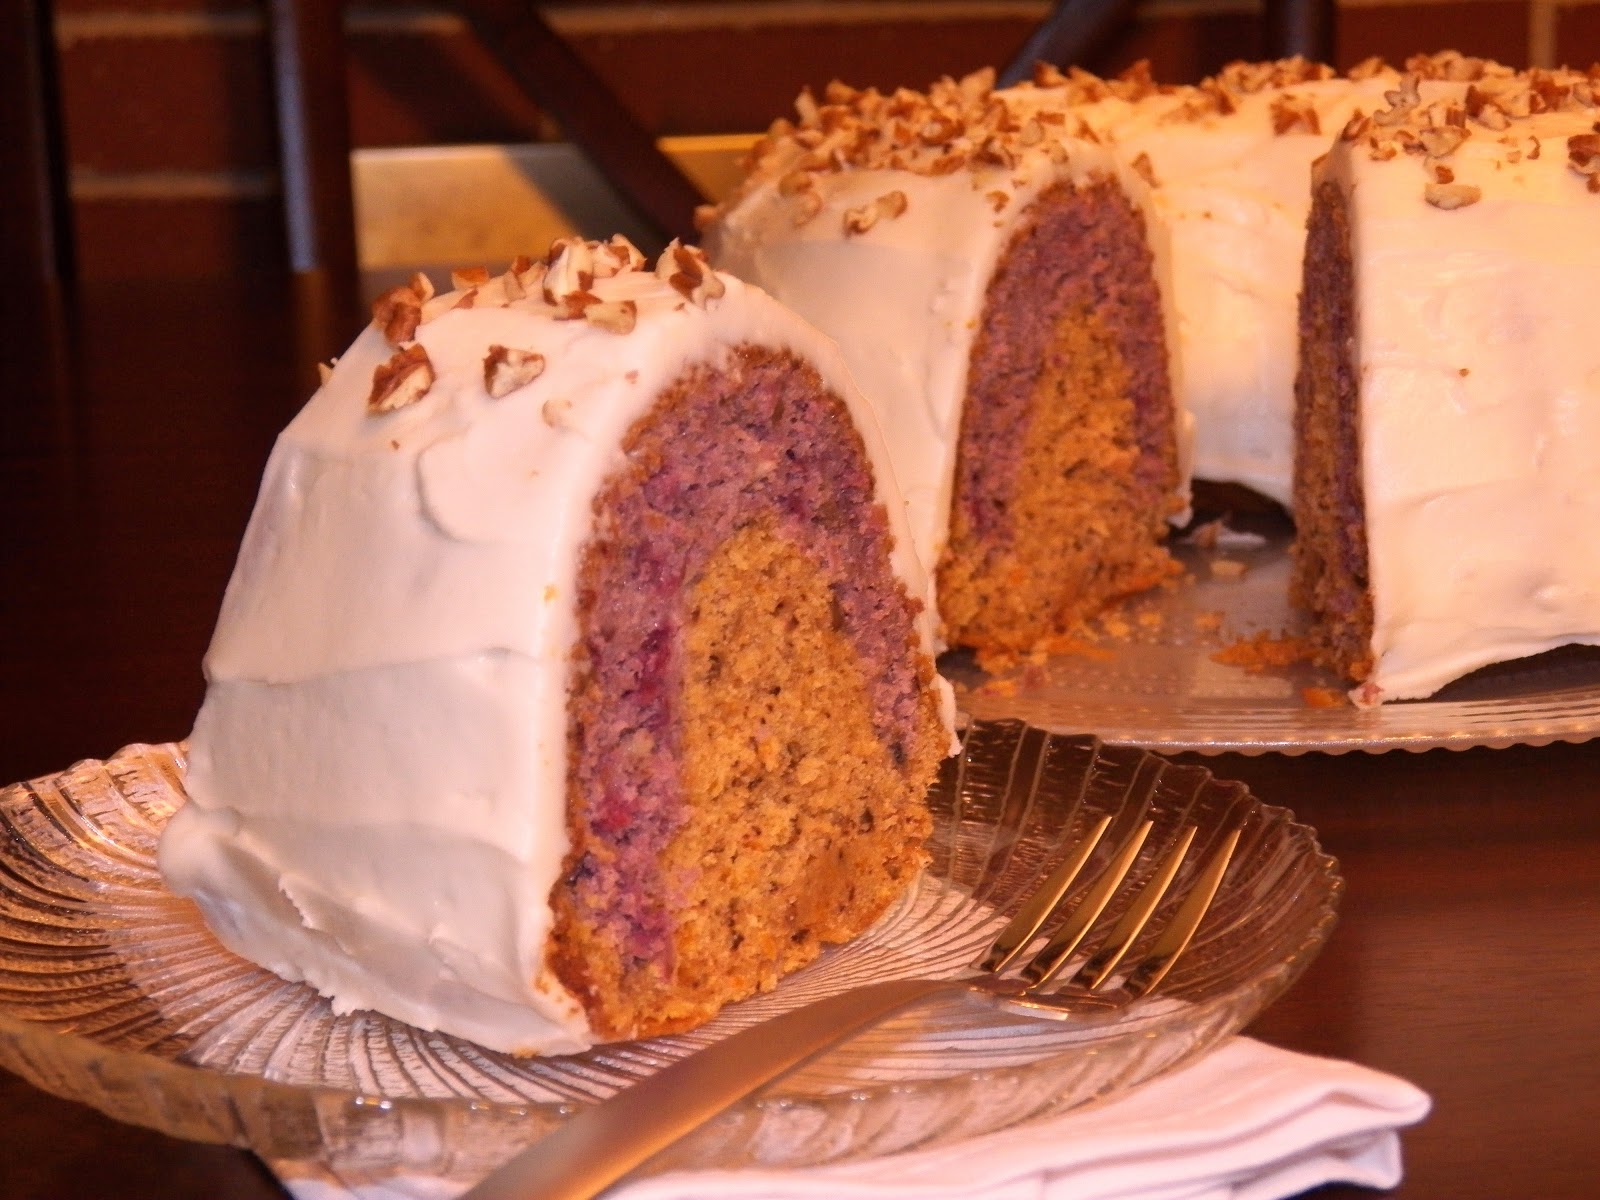
Cranberry Orange Tunnel Bundt Cake

Cranberry Orange Tunnel Bundt Cake

I am happy to announce that I have a new blog, In Good Flavor.  It will contain recipes that I love, ones that I have always wanted to try, and newly discovered finds.  Unlike Food for the Finicky, the new blog will be more indulgent and adventurous with flavors. 

It has been a fun year and if anyone has added any of the recipes from my blog to their own catalog of recipes, I am honored.  But due to time constraints, I will not continue to post on this blog.  I will focus my attention on the new blog and hope that you will find it pleasing to the palate as well as the eyes.

Thank you all so much for joining me this past year.  I leave you with this Cranberry Orange Tunnel Bundt Cake which is also located at In Good Flavor.


Cranberry Orange Tunnel Bundt Cake
Cranberry Cake Layer
2 eggs
1 1/4 cups flour
3/4 cup sugar
6 tblsp. butter, room temperature
3/4 tsp. baking powder
3/4 tsp. baking soda
1/4 tsp. salt
3/4 cup sour cream
1 cup whole cranberries
1/2 tsp. vanilla extract
1/2 tsp. almond extract
1 cup whole pecan (divided)
red and blue gel food coloring

Generously coat a 12 cup capacity bundt cake pan with cooking spray.  Dust with a thin layer of flour.  Tap pan to remove excess flour.

Combine flour, salt, baking powder, and baking soda in a bowl and set aside.

Place all of the pecan in food processor and puree until finely ground.  Divide in half and set aside.  

Place cranberries in the empty food processor and puree.  Set aside.

In a large bowl whisk together  butter  and sugar until light and fluffy.  Add eggs and beat until smooth and consistency slightly thickens, about one minute.  Blend in vanilla and almond extract. 

Alternately add the flour mixture and sour cream, starting with a third of the flour, then half of the sour cream, another third of the flour, the remaining sour cream, and ending with flour.  Blend in cranberries and half of the ground pecan. 

Fill a 1/4 tsp. measuring spoon with 5 parts of red to 1 part of blue food coloring. Blend into batter.  Adjust color as needed to obtain your desired shade.

Pour into the prepared bundt cake pan.  Set aside.


Preheat oven to 350 degress F.


Orange Cake Layer
2 eggs
1 1/4 cups flour
3/4 cup sugar
6 tbsp. butter, room temperature
3/4 tsp. baking powder
3/4 tsp. baking soda
1/4 tsp. salt
1/2 cup sour cream
1/2tsp. vanilla extract
1/2 tsp. almond extract
1/2 of ground pecan from above
grated orange rind from 2 medium oranges ( 1 1/2 to 2 tablespoon grated)
1/4 cup fresh squeezed orange juice
red and yellow food coloring


Combine flour, salt, baking powder, and baking soda in a bowl and set aside.

In a large bowl whisk together  butter  and sugar until light and fluffy.  Add eggs and beat until smooth and consistency slightly thickens, about 1 minute.  Blend in vanilla extract, almond extract, and grated orange peel. 

Alternately add the flour mixture and sour cream, starting with a third of the flour, then half of the sour cream, another third of the flour, the remaining sour cream, and ending with flour.  Blend in orange juice and pecans.

Fill a 1/4 tsp. measuring spoon with 2 parts yellow to 1 part of red food coloring.  Blend into cake batter.  Adjust color as needed to obtain your desired shade.

Pour into the bundt cake pan.  Bake for 45 minutes or until a toothpick comes out with a few crumbs when inserted into cake.  Allow to cool. 

Frost with Cream Cheese Pecan Frosting.  Sprinkle cake with chopped pecan.  Store refrigerated.

Serving suggestions:  microwave slices of cake for 8-10 seconds before serving.  I find that the consistency of refrigerated cakes tend to be rigid and microwaving brings them back to their original consistency.


Cream Cheese Pecan Frosting

8 oz. cream cheese, room temperature (reduced fat is fine)
4 oz. butter, room temperature
1/2 tsp. vanilla extract
1/2 tsp. almond extract
3 cups powdered sugar

Whisk cream cheese and butter until creamy.  Add vanilla and almond extract.  Gradually add powdered sugar.  Whisk until smooth and creamy.


Print Friendly and PDF
Follow FoodforFinicky on Twitter

Tuesday, July 31, 2012

Banana "Ice Cream" Fakeout


banana ice cream fake out, soft serve ice cream

So, the only problem I have with this recipe is that I didn’t come up with it myself!  I saw Rachael Ray make this quick and simple “ice cream” using only bananas and milk, and I had to try it.  The consistency is that of soft serve ice cream.   It’s ingenious AND healthy to boot!

In my haste to share this recipe, I didn’t invest too much time playing around with it.  When I’ve found the opportunity to experiment and come up with additional variations, I will share them with you. 

Until then, here’s how to make it.


To get the ice cream into scooping and stacking 
consistency, I froze it  for about 1 hour.


Banana “Ice Cream” Fakeout
Slightly adapted version of Rachael Ray's

3 bananas, frozen and cut into small chunks
1/4 to1/2 cup milk (I used 1% milk)
1 tbsp. agave nectar (optional, for added sweetness)
1 tsp. vanilla extract  

Start by pulsing banana in a food processor to break up the chunks. 

Puree bananas, adding milk, a little bit at a time, until mixture begins to smooth out.   Add vanilla and agave nectar.  Continue pureeing, adding more milk if needed, until mixture becomes thick, smooth, and creamy. 

Rachael says it should take about 2 minutes to whip.  It took me about 5 minutes.  I had to use a spoon to break up and redistribute the semi frozen mixture a couple of times when it seized up in the food processor.

The original recipe says to serve immediately, but if the consistency is too soft, I recommend freezing the ice cream for at least one hour to firm it up. 

Makes about 3 ½ cups.


Print Friendly and PDF
Follow FoodforFinicky on Twitter

Tuesday, July 3, 2012

Instant Oatmeal Cereal Cookies


instant oatmeal cereal cookies

I wanted to come up with an oatmeal cookie recipe that is unlike any I have ever seen and offers more nutrition than a traditional recipe.  It occurred to me that the perfect solution would be to use a high fiber instant oatmeal cereal as the base.  The one I use is cinnamon flavored with a whopping 10 grams of fiber per packet!  And, because it is a breakfast cereal, it is also enhanced with minerals and vitamins including folic acid.

When you do the math, this recipe uses 8 packets of oatmeal cereal and produces 36 cookies, resulting in cookies that have over 2 grams of fiber each!

It’s a treat I can feel good about eating and serving to the kids.


Instant Oatmeal Cereal Cookies


8 (1.58 oz.) packets of high fiber cinnamon instant oatmeal cereal
1 cup flour
2 tsp. baking powder
8 oz. butter, softened
1/4 cup packed brown sugar
1/2 cup egg substitute


Preheat oven to 350 degree F.

Combine oatmeal cereal, baking powder and flour.  Set aside. 

Beat butter and sugar until smooth and creamy.   Add egg substitute, beating for about 1 minute. It will look lumpy.   Add the dry ingredients and blend well using a wooden spoon.  Dough will be sticky. 

Using a small ice cream scoop (equivalent to one tablespoon), drop batter onto a greased cookie sheet.  Spray hands with cooking spray and press dough into 2” to 2.25” wide discs.  Bake for 10 minutes.  Don’t over bake.  Allow to cool on cooling rack.  Tends to soften when stored at room temp.

Makes about 36 cookies.


Variation:

The guys in my house prefer the drier version slightly more.  For this version, reduce egg substitute to  1/4 cup.  Batter will be thick, using hands to incorporate the dry ingredients into the wet is recommended.  No need to spray hands to press cookies flat.  Bake for 8 minutes.  Don’t over bake.


Print Friendly and PDF
Follow FoodforFinicky on Twitter

Wednesday, June 20, 2012

Peanut Buttery Brownie Torte


Peanut Buttery Brownie Torte,brownie with peanut butter cream cheese frosting

This is by no means a healthy dessert, but I’m taking the opportunity to add a little bit of goodness to it anyway (with the addition of banana and ground flaxseed).  The banana enables less oil to be used, keeps the brownie moist, and provides just a hint of banana.

You may notice from the recipe that I don’t use a lot of sugar in the frosting as I’m not a fan of super sweet frosting.  Add more sugar to suit your own taste. 


Peanut Buttery Brownie Torte

1 (18.3 oz) package brownie mix
2 eggs
1/4 cup water
1/3 cup oil
1 medium banana, thoroughly mashed (about 1/3 cup)
2 tbsp. ground flaxseed
4 oz. cream cheese (low fat or regular), room temperature
1/2 cup powdered sugar
1/3 cup creamy peanut butter
8 peanut butter cup candies (miniature size), chopped
Additional oil for prepping cake pans

Preheat oven to 350 degrees F.

Oil bottom and sides of three 6-inch cake pans.  Line bottom of pans with parchment paper.  Brush top of parchment with additional oil.

Combine brownie mix, water, oil, eggs, banana, and flaxseed.  Whisk until well blended, about 50 strokes.  Divide batter equally into the three cake pans.  Bake for 25 minutes or until toothpick comes out clean when inserted.  Allow to cool.

Beat cream cheese, powdered sugar and peanut butter until smooth and creamy.  Remove brownies from pans and peel off parchment paper.  Stack cake layers, spreading frosting and sprinkling peanut butter cups on top of each layer.


Print Friendly and PDF
Follow FoodforFinicky on Twitter

Tuesday, May 29, 2012

Banana Tempura


banana tempura, fried bananas

It is amazing how sweet banana gets when it is heated.  For this reason, it makes a terrific dessert.

Tempura dishes are traditionally deep fried, but I make this by using the shallow frying method.  I have to admit, I’m not sure if my method really shaves off the calories, but it makes me feel a little better about frying. If you choose to deep fry, set the oil temperature to 175 degrees F and fry bananas about 1 minute or until the batter is golden and crispy.

Whether shallow frying or deep frying, there will be a bit of oil splatter.  I find that using a saucepan or a skillet with deep sides helps reduce the mess.  Don’t let the splattering deter you.  It will be worth the effort!


Banana Tempura

1/2 cup flour
1/4 cup + 2 tbsp. cornstarch
2 tsp. sugar
1/8 tsp. cinnamon
1/2 cup chilled club soda
3 large bananas
canola oil

Whisk the first five ingredients just until smooth, don’t over mix.  Set aside.

Peel and slice bananas to 1/4 - 1/3 inch thick.  Heat a medium size skillet with deep sides on medium to medium high heat.  Add 1/8 inch of oil to skillet. 

Working in small batches, dip a few banana slices in batter.  Add to hot oil, one at a time.  Be careful not to let the batter touch as the bananas will stick to each other.  Cook until the bottom is golden brown, about 2 minutes.  Flip over and cook until the second side is golden and crispy, about 1 minute.  

Transfer to paper towel line plate and gently pat dry.  Transfer again to a serving dish.  Do not let the bananas sit on the paper towel as they may stick.  Serve plain or with a sprinkle of powdered sugar. 


Print Friendly and PDF
Follow FoodforFinicky on Twitter

Friday, March 30, 2012

Fruited Bread Basket

an edible bread basket with a fruit arrangement

This is more of a method than an exact recipe…a completely edible fruity bread basket.  I use a can of refrigerated pizza crust, but any pizza, bread, or pie dough will do.  This basket is berry themed, but any combination of fruit can be used.  Let the florist in you shine!

I make two (approx. 7 inches wide) bread baskets from one can of  pizza crust that has been cut into strips and twisted.  This is not an exact science; make one, two or several smaller baskets.  Just keep in mind, the larger baskets require longer strips of dough which are a little more difficult to handle than shorter ones.  

Fruited Bread Basket

1 13.8 ounce can of refrigerated pizza crust
1 tbsp. butter, melted
1 tbsp. sugar
1/4 tsp. cinnamon (or more if you’d like more cinnamon flavor)
cut up fruit of your choosing
a few sprigs of herbs

Preheat oven to 425 degrees F.

Remove pizza dough from can and unroll on a flat work surface.  Gently stretch and shape dough into a rectangle as best as possible.  Use a pizza cutter or a knife to cut nine strips along the length of the dough.  Strips should roughly be 3/4” x 12”.  Cut six of the nine strips in half.  


For the bottom of the basket:
Take one of the half pieces and twist to create a spiral (I hold an end in each hand and twist the ends in opposite directions).  The dough will stretch as you work with it.  Place on a greased cookie sheet.  Repeat four more times, placing the new spirals underneath the previous ones.  Make sure they come in contact. 

Use a pizza cutter to cut and taper the sides (wider on top, narrow on bottom).  

For the handle:
Twist one of the longer strips and attach handle to the top of the basket.  Note: the longer the handle, the more fruit can be added to the arrangement.

Repeat steps for the second basket.    There should be unused strips which could be used as replacement pieces if needed.

Combine sugar and cinnamon.  Brush the melted butter onto the baskets and sprinkle cinnamon sugar on top.  Bake on upper half of oven for about 18 minutes or until golden brown.  Check oven at the 12 minute mark.  If the baskets bake unevenly, cover the dark areas with foil to prevent over browning.  Allow to cool.  Decorate with fruit and herbs.  Makes 2 (approx. 7 inch wide) baskets.   


Print Friendly and PDF
Follow FoodforFinicky on Twitter

Tuesday, February 28, 2012

Crazy Cake Cupcakes

Crazy Cake Cupcakes

There is a type of cake called Crazy Cake or Wacky Cake.  It does not contain butter or eggs and gets its leavening from chemical reactions between the baking soda and vinegar.  If you have ever had one, you know that it is absolutely moist and delicious and that you would never know there was anything different about it. 

What I love about this type of cake is that it’s so simple to prepare.  My twist on it is the addition of avocado.  Although avocado contains fat, the majority of it is in the form of monounsaturated fat (the good fat).  Avocado is also  heart-healthy, a good source of fiber, and is rich in vitamins.

And, no exaggeration, you can’t taste the avocado in this cupcake, and I mean not even a hint of it!

This is a quick, no fuss, feel-good-about-eating cupcake for any occasion.  I top it with a ganache or a dusting of powdered sugar.  To keep my ganache on the lighter side, I use milk instead of the more commonly used heavy cream.


Crazy Cake Cupcakes

1 1/2 cup flour
2 tbsp. flaxseed meal
1 tbsp. Stevia Powder
1/2 cup sugar (if you want to omit Stevia, use 1 cup sugar)
1/2 to 2/3 medium avocado, well mashed with fork
3 tbsp. cocoa powder
1/2 tsp. salt
1 tsp. baking soda
1 tbsp. vinegar
3 tbsp. vegetable oil
1 tsp. vanilla extract
1 cup cold water

Ganache:
¼ cup semi sweet chocolate chips
1 scant tbsp. milk

Preheat oven to 350 degrees F.  Combine all dry ingredients in a large bowl.  Use a whisk to blend.  Make three holes in mixture.  Put oil in one hole, vanilla in the second, and vinegar in the third.  Add water and avocado.  Blend using a whisk (about 50 strokes).  Line a muffin tin with baking liners or coat with cooking spray.  Fill each cup 2/3 full with batter.  Bake about 16 - 18 minutes.  Allow to cool.


To make the ganache, place chocolate chips and milk in a small microwaveable bowl.  Microwave for 20 seconds.  Stir until smooth.  If needed, microwave for an additional 10 seconds and stir.  Spread over top of the cupcakes.  Store ganache topped cupcakes in the refrigerator. 

Makes 12 cupcakes.


Print Friendly and PDF
Follow FoodforFinicky on Twitter

Monday, January 9, 2012

Strawberry Applesauce Granita

Strawberry Applesauce Granita


A granita is a semi frozen dessert that very much resembles a sorbet.  I was inspired by Melissa D’Arabian who made Applesauce Granita with Maple Yogurt.  She has many wonderful recipes.  I made her granita, which consisted of applesauce and lemon juice, and although it may appeal to adults, the children were not enthusiastic about it.  So…it was back to the drawing board for me.

I loved the simplicity of Melissa’s recipe, liked her used of applesauce, and wanted incorporate it into my version.   After several trials and flavor combinations, fresh strawberry and applesauce was decidedly the winning pairing. It was much better received by the kids than its predecessor.  To keep the granita low sugar, I also used unsweetened applesauce, but added Stevia powder as my sweetener.  You could, of course, use the sweetener of your choice.  

This granita is so full of goodness that it doesn't do it justice to call it a dessertit is good anytime.  It is a deliciously simple, healthy, and refreshing treat that you will feel good giving to the kids.


Strawberry Applesauce Granita

2 cups fresh strawberries, halved
1 cup unsweetened applesauce
1 tsp. Stevia powder
1/2 tsp. vanilla extract
6 oz. vanilla yogurt

Puree all ingredients except yogurt in a food processor or a blender.  


Place in a shallow container, cover and freeze for 1 hour.  Remove from freezer and scrape the frozen areas of the granita using a fork.  The center may be soft, return to the freezer for 1 hour and scrape again.  Repeat as necessary.  Serve with a dollop of vanilla yogurt.


Any unused granita will solidify once again in the freezer after a period of time.  To serve, allow to defrost at room temperature for about 10 minutes and fluff with fork.


Print Friendly and PDF
Follow FoodforFinicky on Twitter

Thursday, December 1, 2011

Frozen Chocolate Covered Sweet Potato Pops

I woke up one day wanting to do something unusual with sweet potatoes that children would really enjoy.  What do children like?  Well…chocolate, lollipops, and popsicles, but the trick was how to incorporate sweet potato into this combination.  It then dawned on me that foods tend to lose their flavor when frozen.  I realized that sweet potato will lose its flavor in the freezer, and to cover it with chocolate—it was a no brainer!

chocolate covered sweet potato pop

This snack will allow you to feel less guilty about giving your child (or yourself) a sweet treat.  The only discernable taste in it is chocolate.  I felt the need to add a healthy dimension to the chocolate portion and decided that dark chocolate, with some beneficial properties, would be a good option.  Since children don’t generally like dark chocolate, I combined it with milk chocolate to balance out the flavor.  It was a big hit!!


Frozen Chocolate Covered Sweet Potato Pops

1 medium sweet potato, peeled
1/3 cup dark chocolate chips
1/3 cup milk chocolate chips
Small cookie cutter or fondant molds (1 1/4 inch or less in diameter)

Fill a medium size saucepan half full with water and bring to a boil. 

Make a thin slice along one side of potato to create a flat surface so that the potato does not roll on the cutting board.  Cut slices between 1/4 - 1/3 inch thick.  Add to boiling water.  Boil potatoes, loosely covered for 10 – 12 minutes on medium to medium high heat, until soft, but not falling apart. Taste to check for doneness; it is important that potatoes are not undercooked.  

Gently remove potatoes using a slotted spoon, rinsing quickly under cold water to cool before transferring to a flat surface.  Pat dry using paper towels.  Allow to cool completely. 

Use cookie cutters to cut out potato shapes.  Then, place on a wax paper lined cookie sheet, leaving space between each for the lollipop sticks.  Insert a stick into each using one hand to apply gentle pressure on the top and sides of the potato to prevent splitting.  If the potato splits, gently press it back into shape around the stick and freeze for 1 hour.

Combine chocolates in a microwave safe bowl and microwave for 30 seconds.  Stir.  Return to microwave for another 10 seconds, stir.  Repeat until chocolate is completely melted.  Remove potato pops from freezer.  Coat the pops with chocolate using a small rubber spatula.  Place back on wax paper.  Refreeze pops, for at least 6 hours—the longer, the better.  The potatoes need time to get completely frozen.

Note:  When using regular size cookie cutters (2 inch to 2 ¼ inch diameter) the wait time in the freezer for the first freeze increases to 2 hours and the second freeze is at least 8 hours (overnight is best).


Print Friendly and PDF
Follow FoodforFinicky on Twitter

Thursday, November 3, 2011

Yummy Black Bean Brownie

My sister introduced me to the black bean brownie during one of her visits from Colorado.  It was delicious, but more suited for the adult taste palate, so I played around with the recipe until I achieved the texture and flavor more suited for children.  

Yummy Black Bean Brownie

The recipe below has both regular and low sugar options.  My sweetener of choice is White Stevia Powder.  To make a low sugar brownie, I use a combination of sugar and Stevia.

The first time I served this to a test group of children, four out of four ate it and three asked for more.  My teenage son who won’t eat beans, except for green beans, asks for this brownie!

Yummy Black Bean Brownie

1 can black beans, rinsed and drained
3 eggs
3 tbsp. vegetable oil
1/4 cup cocoa powder
2/3 cup sugar or
1/4 cup sugar + 1 tsp. Stevia powder
1/4 cup flour
1 tsp. vanilla extract
1/3 cup ripe mashed banana
1/4 cup chocolate chips
1 tbsp. decorative sprinkles
Pinch of salt

Preheat oven to 350 degrees F.  Grease 8” x 8” baking pan.

Combine all ingredients except for chocolate chips and sprinkles in a food processor until smooth.  Pour 2/3 of batter into pan, sprinkle on chocolate chips, and cover chips with remaining 1/3 of batter.  Bake for 18 minutes, remove from oven, and add decorative sprinkles on top.  Bake for an additional 10 minutes or until a toothpick comes out clean when inserted.  Cool completely, best when allowed to sit a few hours before serving.  Cut into shapes using a cookie cutter, optional.  Store refrigerated.

Note:
To make this recipe even lighter, replace eggs with 3/4 cup egg substitute.  Increase baking time 2-4 minutes.

Print Friendly and PDF
Follow FoodforFinicky on Twitter