Thursday, December 22, 2011

Tuna Fried Rice

I swear, when I gave this dish to a group of four toddlers and preschoolers for the first time, I was pleasantly surprised by the result.  Not only did ALL of them finished their serving, but 3 asked for seconds!!  If you want to introduce tuna to a child, try this first!  I believe the soy sauce is the key because it masks the taste of the tuna. Additionally, the super sweet corn adds a nice contrast to the saltiness of the dish, and all the children can taste is deliciousness.

tuna fried rice

Note:  Tuna, while nutritious, contains some amount of mercury and should be eaten in limited quantities.  This recipe uses only one 5 oz. can of tuna for about 10 half cup servings, therefore, I feel comfortable serving this once or twice a month.  The American Pregnancy Association’s web page has recommendations on portion size and frequency of tuna consumption.


Tuna Fried Rice

4 cups refrigerated cooked rice
1 5-oz. canned tuna, drained and flaked with fork
2 eggs
1 tbsp. milk
3/4 cup super sweet canned corn, drained
3 tbsp. cup finely chopped scallion (greens only)
1/4 tsp. garlic powder
1/2 tsp. salt
1/4 tsp. pepper
1 tbsp. soy sauce
olive oil

Heat a large skillet on medium heat. Coat the bottom of pan with oil.  In a small bowl, whisk milk and eggs.   Add to skillet, allow bottom of eggs to set and become lightly golden, about 2 minutes.  Flip eggs over and cook for about 15 seconds.  Remove from heat and  chop eggs using spatula.  Transfer to a plate.


To the same pan, on medium high heat, add oil to coat bottom.  Add scallion, stirring for 2 minutes.  Add rice, corn, garlic powder, salt, pepper, and soy sauce.  Stir until heated through, about 2 minutes.  Add tuna and eggs, gently stirring for another 2 minutes.  Serve.

Print Friendly and PDF
Follow FoodforFinicky on Twitter

Friday, December 9, 2011

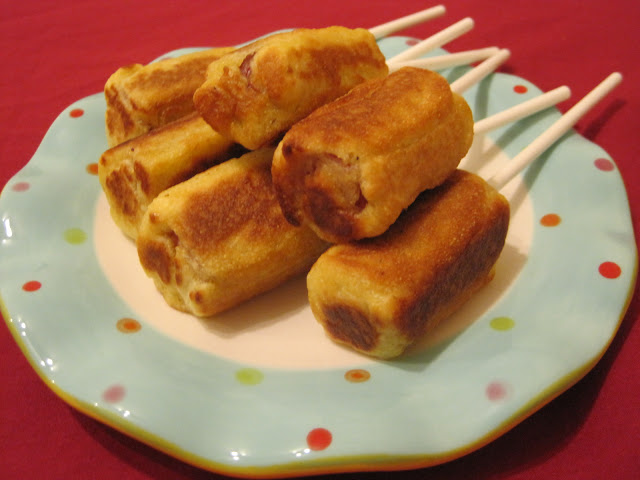
Party Unfried Mini Corn Dogs

I wanted to use the most healthy “hot dog” available to me, so for my first attempt, I used meat sticks for toddlers, the kind that comes in a glass jar in the baby food section.  Unfortunately… let’s just say that I didn’t bother to ask for taste testers for my first trial.  It was a flop!  I then opted to use turkey hot dogs which are less caloric than their counterpart.  I’m please to say that my taste testers approved of this option.
                                                                                                                
I am eager to share this recipe with you.  However, I will continue to work on it to create a no sugar version as this one uses regular sugar. I will update this post once that is accomplished. 
                                              
Note:  After a little bit of experimenting, I found that 1 1/2 tsp. of Stevia is a good substitution for the sugar in this recipe.  If you want to increase the Stevia, I suggest doing it in 1/4 tsp. increments as a little bit of it goes a long way.

unfried mini corn dogs


Party Unfried Mini Corn Dogs

3/4 cup flour
1/2 cup corn flour
1 1/2 tsp. baking powder
1/8 tsp. salt
3 tbsp. sugar
3 tbsp. golden flaxseed (optional)
1 egg
7 tbsp. milk 
8 to 10 turkey hot dogs (cut into thirds)
olive oil

Mix together the first six ingredients.  Beat in egg and milk until batter has the consistency of thick pancake.  Add additional milk, 1 tsp. at a time of batter is too thick.

Heat a medium non-stick skillet on medium heat.  Add enough oil to lightly coat bottom of skillet.  Work in small batches to allow time to flip corn dogs while cooking (no more than 6 at a time).  Dip hot dogs into batter to completely coat, using fingers for best results.  Place in skillet.  Turn each hot dog a quarter turn once the bottom has firmed up, in about 30 seconds.  Repeat this step for the other three sides to shape the corn dogs.  Allow each side to brown for an additional minute per side.


Turn over a quarter turn when bottom firms up in about 30 seconds.
Dogs shaped.  Continue to brown, then stand on end to brown ends.
Stand dogs on ends to brown.  This should only take about 15 seconds per end.  Insert popsicle sticks before plating.


Print Friendly and PDF
Follow FoodforFinicky on Twitter

Thursday, December 1, 2011

Frozen Chocolate Covered Sweet Potato Pops

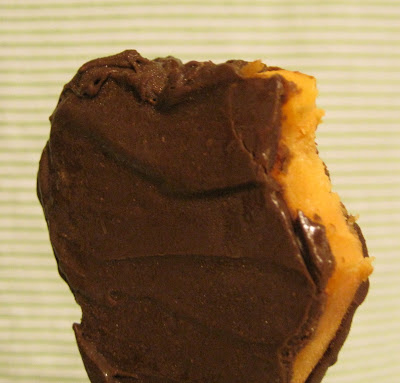
I woke up one day wanting to do something unusual with sweet potatoes that children would really enjoy.  What do children like?  Well…chocolate, lollipops, and popsicles, but the trick was how to incorporate sweet potato into this combination.  It then dawned on me that foods tend to lose their flavor when frozen.  I realized that sweet potato will lose its flavor in the freezer, and to cover it with chocolate—it was a no brainer!

chocolate covered sweet potato pop

This snack will allow you to feel less guilty about giving your child (or yourself) a sweet treat.  The only discernable taste in it is chocolate.  I felt the need to add a healthy dimension to the chocolate portion and decided that dark chocolate, with some beneficial properties, would be a good option.  Since children don’t generally like dark chocolate, I combined it with milk chocolate to balance out the flavor.  It was a big hit!!


Frozen Chocolate Covered Sweet Potato Pops

1 medium sweet potato, peeled
1/3 cup dark chocolate chips
1/3 cup milk chocolate chips
Small cookie cutter or fondant molds (1 1/4 inch or less in diameter)

Fill a medium size saucepan half full with water and bring to a boil. 

Make a thin slice along one side of potato to create a flat surface so that the potato does not roll on the cutting board.  Cut slices between 1/4 - 1/3 inch thick.  Add to boiling water.  Boil potatoes, loosely covered for 10 – 12 minutes on medium to medium high heat, until soft, but not falling apart. Taste to check for doneness; it is important that potatoes are not undercooked.  

Gently remove potatoes using a slotted spoon, rinsing quickly under cold water to cool before transferring to a flat surface.  Pat dry using paper towels.  Allow to cool completely. 

Use cookie cutters to cut out potato shapes.  Then, place on a wax paper lined cookie sheet, leaving space between each for the lollipop sticks.  Insert a stick into each using one hand to apply gentle pressure on the top and sides of the potato to prevent splitting.  If the potato splits, gently press it back into shape around the stick and freeze for 1 hour.

Combine chocolates in a microwave safe bowl and microwave for 30 seconds.  Stir.  Return to microwave for another 10 seconds, stir.  Repeat until chocolate is completely melted.  Remove potato pops from freezer.  Coat the pops with chocolate using a small rubber spatula.  Place back on wax paper.  Refreeze pops, for at least 6 hours—the longer, the better.  The potatoes need time to get completely frozen.

Note:  When using regular size cookie cutters (2 inch to 2 ¼ inch diameter) the wait time in the freezer for the first freeze increases to 2 hours and the second freeze is at least 8 hours (overnight is best).


Print Friendly and PDF
Follow FoodforFinicky on Twitter